An engaged approach to cooking
Wednesday, November 6, 2013
The best is yet to come...
Realizing the incredibly low readership of this publication (echo), I wanted to make a statement to anybody who might stumble across this and think it is dead. Rest assured it is not, and there are many many ideas floating around inside my head. This past year has been incredibly difficult for my family and me, and while we are on the path to improvements, have not quite made it there yet. So hold tight, because exciting things are right around the corner....
Tuesday, March 26, 2013
Of Bakers and Bread
When Hands-On Cuisine was only a thought in my head, I never imagined it to be solely a repository for my own recipes; I wanted to include my own culinary thoughts and musings as a reflection upon cooking in a modern household. A lot can happen in one year, and culinary discoveries can be made!
I like to experiment with different and unfamiliar processes, and over the past few months I have taken up the mysterious art of bread baking. I was captivated by how four of the most simple ingredients, flour, salt, water, and yeast, can elicit such a wide variety of results while carrying such stigma for being difficult and time consuming. Bread has been the staple food of the western diet for thousands of years, and I find it amazing that a skill so integral to even our most recent ancestors has been nearly totally lost in the last 50 to 100 years. What happened? I, not unlike the proverbial cat, had to have my curiosity resolved; I had a whole modern kitchen at my disposal,which is certainly more than medieval Europeans had, this couldn't be that hard.
Since my curiosity was piqued I did what now comes naturally to me; I hit up the internet and was speedily overcome with a sense of information overload. It seemed like there was so much information, yet so little actual content. I'm sure you know the feeling, hell, it might even be what brought you here. It seems the world of bread baking is filled with people who all have THE ABSOLUTE BEST RECIPE IN THE UNIVERSE AND THEN SOME!!!!, and as we all know if you set astronomical expectations you best be prepared for disappointment. So in an effort to help you save some time and frustration I want to give out some pointers to the burgeoning baker as the kickoff to a somewhat periodical series on bread.
If you are really interested in trying your hand a bread baking I would suggest picking up a good book on baking, many of which also include sections on cookies, cakes, and a wide variety of delicious confections. I find a good book clearly teaches the fundamentals of baking and will usually provide extremely helpful illustrations from master artisans. While I have bought and tried out a few different books, one that I have absolutely fallen in love with is Buchon Bakery by Thomas Keller and Sebastien Rouxel (2012). The book was a gift from my wife and has been absolutely wonderful. I find Keller and Rouxel's approach to be straightforward with a rich and experienced presentation. The bread baking segment is geared for the home-cook and I found it easy to jump right in. They even note that every recipe has been ideally scaled for preparation using a KitchenAid stand mixer, which is extremely convenient. They also provide all measurements in grams, which ensures that the recipes are reproduced exactly and consistently; baking does require you to be a bit more exact in your measurements after all. This book has helped me to understand the chemistry behind bread baking and acted as an outstanding introduction. This was exactly what I was looking for.
The intent of this post was not a book review, but as an introduction to a world I have recently discovered and found to be quite delicious; a way to get your hands doughy if you will. Gone are the days of overpriced baguettes in our house, but here to stay are fresh bread bowls for soups and warm bread straight from the oven! So with that in mind keep your eyes peeled for some exciting new entries on bread.

A French batard prepared following Buchon Bakery's instructions.
Monday, March 25, 2013
A Year in Review
Ideas always seem bigger inside my head. Now that we are approaching the first year of Hand-On Cuisine I can heartily say that I am happy with where it went and am excited to what the future has in store. (You can't get rid of me that easily!) Now, all other things aside, this past year has proven to be much more difficult than I had ever expected on a personal level, but alas that is no excuse for laxity! For this next year I plan on continuing to provide an exciting approach to home cooking, but also want to find ways to incorporate more interesting content to help the home cook whip up some amazing recipes. So pardon the food puns, but stay peeled for more exciting things! And make sure to "LIKE" me Facebook or follow me on Twitter! (Do I need a catch-phrase? It seems like one would fit her perfectly.)
Thursday, January 3, 2013
How do you like your chicken? A lefty friendly guide to breaking down this most popular poultry
In America today it seems nothing is more important than convenience, but what frequently remains unnoticed is the extra price we incur for it. One place that this can be most obvious is at your local meat counter. One of the easiest ways to spare your wallet is to steal some very easy work from the butcher (not to say we don't want to keep him gainfully employed.) I'm not suggesting you go kill and clean your own livestock, rather, pinch a few pennies by utilizing some tools nearly everybody already has in their kitchen. Of course the best part is that you need no formal training, and by simply remembering a few tricks and taking a hands-on approach you can keep your bank account a little bit happier.
So let's take a look at something you are all probably very familiar with; Gallus gallus domesticus, a.k.a. the chicken; a protein which since the early 90's has become the most consumed protein in the United States. (See: http://www.meatami.com/ht/a/GetDocumentAction/i/48781) According to the American meat institute you and your neighbor ate roughly 85 pounds of the stuff each last year. Assuming you're eating this all at home, the next natural question is where you're getting your birds. I buy all my meat at the local bulk store, e.g. Costco, where you can reap the benefits of buying in larger quantity. Next we will look at the cut; taking convenience into factor we will assume you are buying boneless skinless breasts. They're practically instant gratification, which is something you will pay for at an average price somewhere between $3-$4 per pound. Multiply that (we'll say $3.50) by the 85 pounds we ate last year and you get an annual cost of almost $300 on chicken alone! Can you see where I'm heading? I buy all my chickens as whole fryers; fresh, young, and small compared to their larger counterparts the roasters (which are often injected with a brine or marinade of some sort. yuk.) I've seen these go as low as $.79 per pound, but most often pay $.99. So right there I save almost $200 a year just by buying the whole packaged deal! If somebody were to pay me an hourly rate to break down 85 lbs of whole chickens over the course of a year, I would most certainly not make $200, but that's what you're paying your butcher...
Now I know what you're thinking. I can steal the words right from your lips. "You're paying for the bones and gizzards also, which totally go to waste." Not here they don't! Oh no, when I'm done the only thing that makes the trash can is the plastic bag and the extra fat (which could be rendered down into a product called schmaltz.) The wing tips, organs, necks, backs, and anything else all make their way to the stock pot, (I'm sensing a future entry here). So without further ado we will now examine how one can easily break down a chicken into its constituent, and tasty, parts.
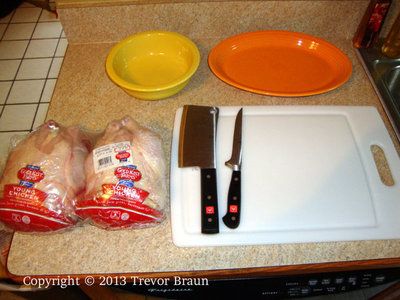
Tools you will need:
Knife: You can easily get away with using your Chef's Knife. Since I look for ways to blow my money on expensive kitchen gadgets I use a boning knife and cleaver. These are by no means necessary (but rather fun)!
Large Plastic Cutting Board: Mine has a nice groove cut into the surface which helps to keep any liquid on the board and off the counter. Plastic is easily sterilized in the dish washer, whereas wood can soak up harmful bacteria.
Plastic Baggies: I usually do this 6 chickens at a time and proceed to freeze all the parts for later use. I really love using Ziploc vacuum bags as they keep the freezer burn to a minimum.
Large bowl and Platter: As a pre-bagging staging area.
Step 1: It is very important to make sure that you have everything set up and ready to go before you begin. Once you get started things can quickly become quite messy. Disorder can be kept to a minimum by having all your supplies nearby and a garbage can at the ready. With that being said, I feel I must give the standard disclaimer on food safety, especially when handling raw meat and poultry.
One of the things taking a hands-on approach to cooking means is doing something yourself in order to gain a greater appreciation of what makes it to your table. There are often reasons why people would prefer to buy pre-processed items: mainly time related but also ease of use. Raw poultry can harbor a wide variety of nasty microbes, and you can be put at risk if you do not take the proper precautions to safeguard against food-borne illness. When doing a job like this it is important for you to try and keep your mess as contained as possible. Make sure the drippy chicken packaging makes it straight to the trash and doesn't leave a wet trail on the floor. Turn the sink on and off with your clean elbow in order to minimize contaminating the handles with your icky hands. Carefully disinfect your counter top and preparation area when complete. A little common sense goes a long way when it comes to food safety, especially around the house.
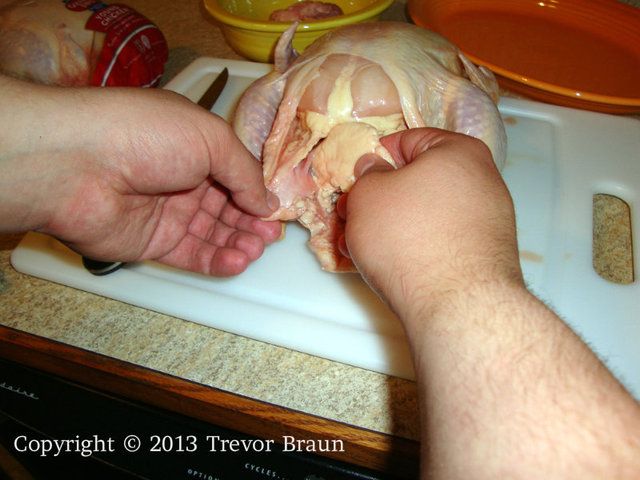
Step 2: Remove the chicken from the packaging and pull-out the giblets which are stored inside the cavity. As I mentioned above these should be reserved for later use. If nothing else you can cook em' up for the dog, but that would be a waste of all the wonderful flavors locked away inside. Also give your bird a quick rinse, then set breast-side up on your cutting board. You might notice some big fat deposits clinging to the skin near the cavity. These can simply be pulled off and discarded.
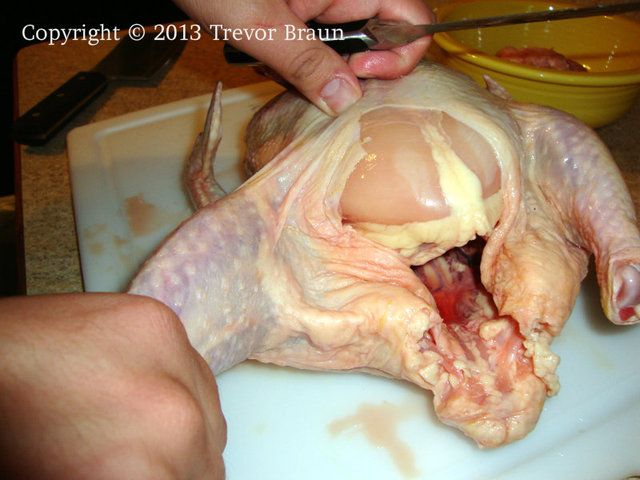
Step 3: As I get told every day (it goes in one ear and out the other), exercise is good for you. The same goes for your meat... er... I know it sounds a bit macabre but this might be the one time you get to play with your food! Your once-feathered friend will be a bit stiff from it's trip to the supermarket, and some simple stretches will help free it up so your cutting job is a bit easier. Give the wing and leg joints a few good extensions until you feel them start to free up and get loose.
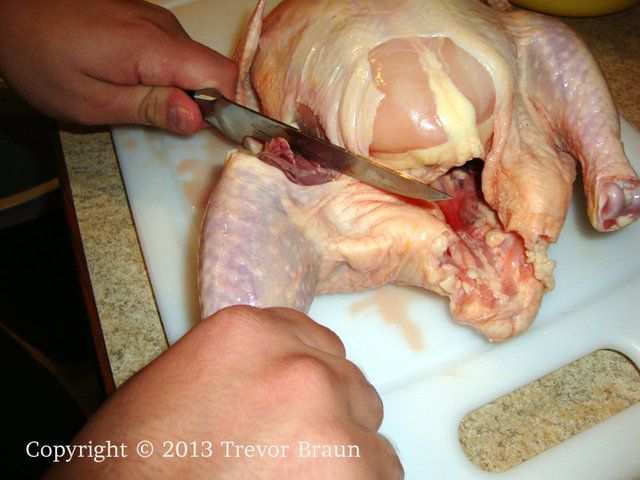
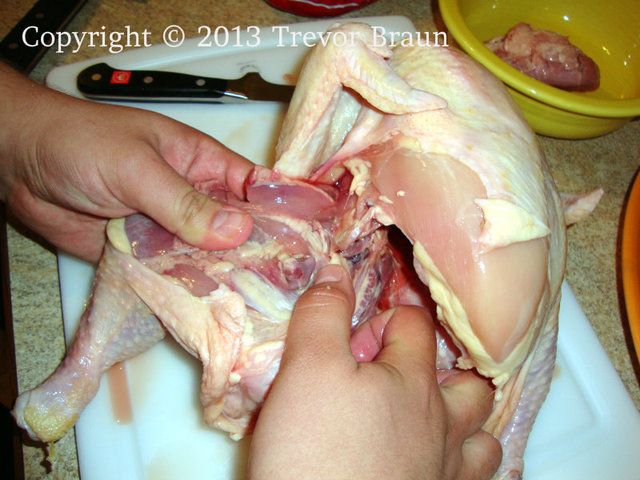
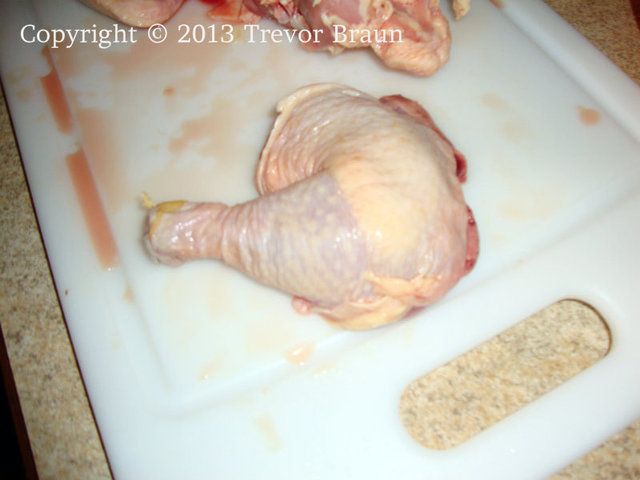
Step 4: The first cut you will make will be to remove the leg and thigh combo, aka leg quarter, which is my favorite part... but you already know that from my Minneola Chicken recipe. First extend out the joint and hold it firm. Then pick up your boning knife (or whichever knife you will be using) and make the first incision in between the skin and staying close to the body until you hit the thigh joint.
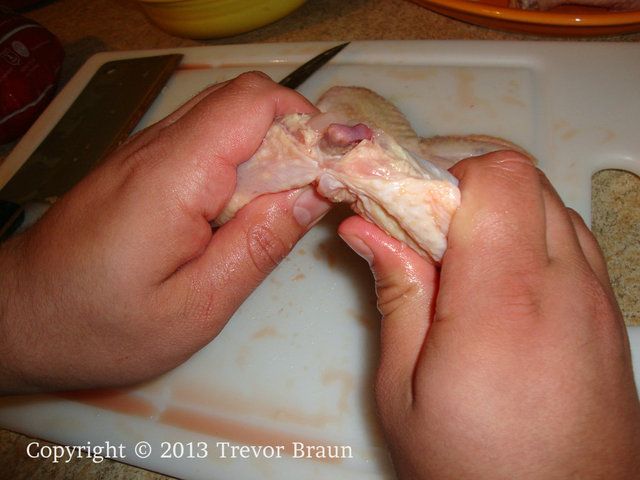
Step 5: It was at this point that I came up with the subtitle for this entry. My apologies for all you righties out there, you can now understand the grief us lefties go through every single time you show us how to do something. (See pictures if you don't get it yet. And no, I don't have ADD.) Once you hit the joint use your fingers (see figure below) to forcefully dislocate it. After you've popped it out you can simply cut through the remaining tissue and remove the whole leg quarter. Beautiful! Repeat for the other side!
Step 6: Now we will remove the wings, which is a process very similar to removing the leg. Approaching from the armpit... rather... wingpit area cut in until you reach the joint, and pop it out just as you did with the thigh. You can then easily cut through and remove the wing. Repeat.
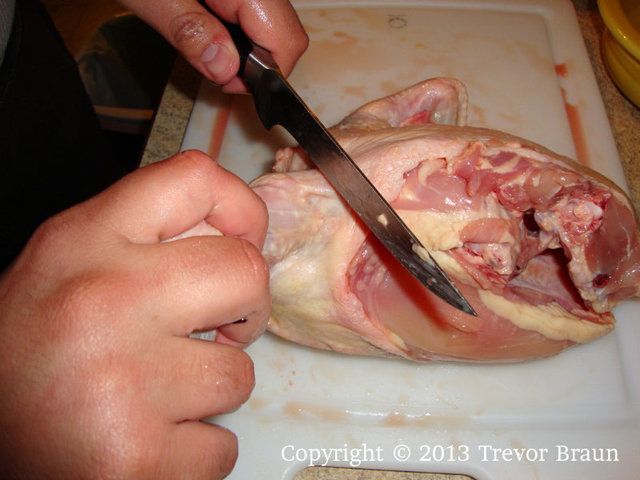
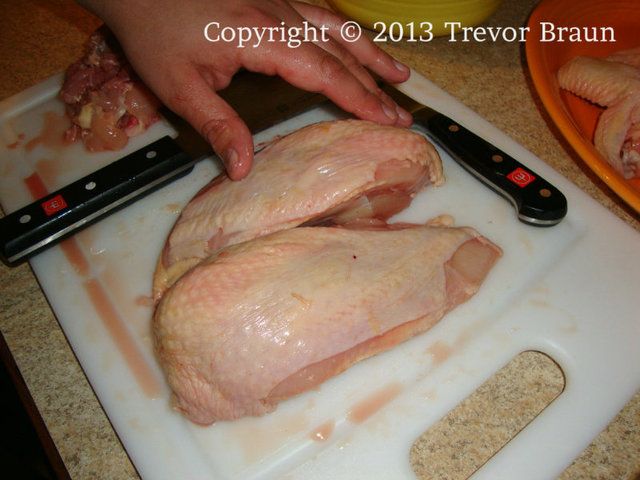
Step 7: Next we will remove the breasts. Take up your cleaver in one hand and rest the chicken vertically on the cutting board with the cavity facing up. With the legs removed you should be able to see where the breast and ribs connect to the back. Apply strong downward pressure with a slight sawing motion to almost effortlessly separate the breasts from the back. Use the weight of the cleaver to cut through the ribs; that's what it was designed to do! Cleavers are not incredibly sharp, and are cut at a wider angle than most other knives, making them extremely poor slicers. They get their strength from their weight and are an indispensable tool when cutting through bones and breaking-down meat and poultry.
Step 8: At this point we have the following prepared parts: 2 leg quarters, 2 wings, 1 split breast, and a back. You could stop right here. A chicken breast that has not yet been separated is called a split breast, and while rather large are actually great for the grill. There are also some wonderful stuffed preparations utilizing aluminum foil along the underside. Keeping the breast together with the skin and bones helps the meat stay moist and flavorful. I almost always take it a step further though and separate the breasts; it makes the much easier to handle and serve for most dishes.
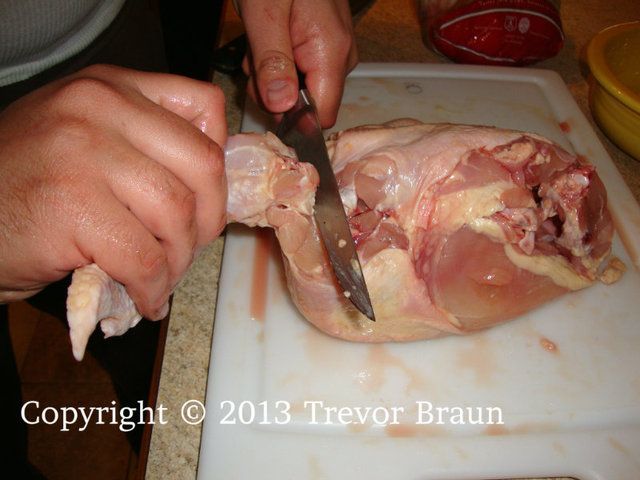
Again we will use our cleaver because we will be cutting through the breast bone. I like to make a quick slit to split the skin, and then set the cleaver along the bone. Finally give it a good solid pound with your fist and the breasts should split cleanly in two. Now that's what I call cleavage... I prefer to stop here, as I almost always leave the skin on through any cooking process; serving it skin-on it if it's crispy preparation or removing and discarding before serving if otherwise. Leaving the skin on during cooking really helps lock in moisture and provide a much tastier dish. If boneless skinless are your thing, then simply pull off the skin and cut out the remaining breast bones. It's really that simple.
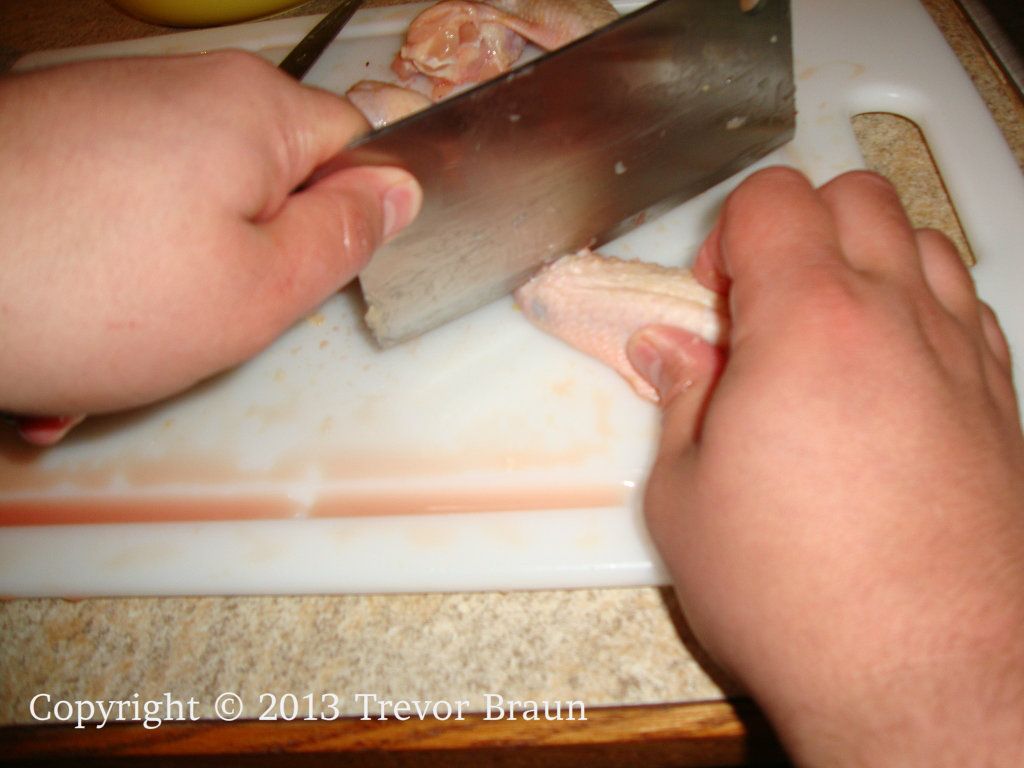
Step 9: If there's one all-american junk food I enjoy it has to be buffalo chicken wings. Consequently, chicken wings aren't really good for much else, but they are always broken down into those scrumptious little pieces. Using the cleaver and one firm fist pound remove the wing tip at the joint; I save all these for the stock pot. Finally, with your boning knife pop out and then cut through the remaining joint. Voila! Chicken Wings. I toss these all into a gallon freezer bag we keep in the deep freeze in the basement. When the bag gets full we fry up chicken wings. I can't think of a better utilization for this all-too oft overlooked appendage.
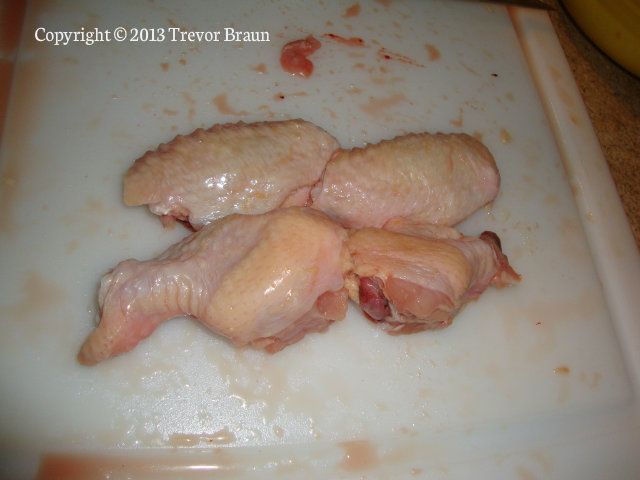
Step 10: You now have all your pieces parts separated, and after some practice your cuts will look just as clean as what you would buy at the supermarket. Carefully bag them up in whichever combination you please and freeze for later use, or toss them immediately on the grill, or in the oven. The possibilities are endless.
Oh, I forgot, Step 11: Make sure you carefully clean everything up and sanitize all nearby surfaces. All that hacking about with your cleaver was bound to spray a little goo somewhere, and I personally don't prefer salmonella in my morning coffee.
So there you have it folks, another one for the books. Geeze... that took over 6 months. More to come, and sooner I hope!
All photos Copyright © 2013 Hands-On Cuisine/Trevor Braun
So let's take a look at something you are all probably very familiar with; Gallus gallus domesticus, a.k.a. the chicken; a protein which since the early 90's has become the most consumed protein in the United States. (See: http://www.meatami.com/ht/a/GetDocumentAction/i/48781) According to the American meat institute you and your neighbor ate roughly 85 pounds of the stuff each last year. Assuming you're eating this all at home, the next natural question is where you're getting your birds. I buy all my meat at the local bulk store, e.g. Costco, where you can reap the benefits of buying in larger quantity. Next we will look at the cut; taking convenience into factor we will assume you are buying boneless skinless breasts. They're practically instant gratification, which is something you will pay for at an average price somewhere between $3-$4 per pound. Multiply that (we'll say $3.50) by the 85 pounds we ate last year and you get an annual cost of almost $300 on chicken alone! Can you see where I'm heading? I buy all my chickens as whole fryers; fresh, young, and small compared to their larger counterparts the roasters (which are often injected with a brine or marinade of some sort. yuk.) I've seen these go as low as $.79 per pound, but most often pay $.99. So right there I save almost $200 a year just by buying the whole packaged deal! If somebody were to pay me an hourly rate to break down 85 lbs of whole chickens over the course of a year, I would most certainly not make $200, but that's what you're paying your butcher...
Now I know what you're thinking. I can steal the words right from your lips. "You're paying for the bones and gizzards also, which totally go to waste." Not here they don't! Oh no, when I'm done the only thing that makes the trash can is the plastic bag and the extra fat (which could be rendered down into a product called schmaltz.) The wing tips, organs, necks, backs, and anything else all make their way to the stock pot, (I'm sensing a future entry here). So without further ado we will now examine how one can easily break down a chicken into its constituent, and tasty, parts.
Tools you will need:
Knife: You can easily get away with using your Chef's Knife. Since I look for ways to blow my money on expensive kitchen gadgets I use a boning knife and cleaver. These are by no means necessary (but rather fun)!
Large Plastic Cutting Board: Mine has a nice groove cut into the surface which helps to keep any liquid on the board and off the counter. Plastic is easily sterilized in the dish washer, whereas wood can soak up harmful bacteria.
Plastic Baggies: I usually do this 6 chickens at a time and proceed to freeze all the parts for later use. I really love using Ziploc vacuum bags as they keep the freezer burn to a minimum.
Large bowl and Platter: As a pre-bagging staging area.
Step 1: It is very important to make sure that you have everything set up and ready to go before you begin. Once you get started things can quickly become quite messy. Disorder can be kept to a minimum by having all your supplies nearby and a garbage can at the ready. With that being said, I feel I must give the standard disclaimer on food safety, especially when handling raw meat and poultry.

One of the things taking a hands-on approach to cooking means is doing something yourself in order to gain a greater appreciation of what makes it to your table. There are often reasons why people would prefer to buy pre-processed items: mainly time related but also ease of use. Raw poultry can harbor a wide variety of nasty microbes, and you can be put at risk if you do not take the proper precautions to safeguard against food-borne illness. When doing a job like this it is important for you to try and keep your mess as contained as possible. Make sure the drippy chicken packaging makes it straight to the trash and doesn't leave a wet trail on the floor. Turn the sink on and off with your clean elbow in order to minimize contaminating the handles with your icky hands. Carefully disinfect your counter top and preparation area when complete. A little common sense goes a long way when it comes to food safety, especially around the house.
Step 2: Remove the chicken from the packaging and pull-out the giblets which are stored inside the cavity. As I mentioned above these should be reserved for later use. If nothing else you can cook em' up for the dog, but that would be a waste of all the wonderful flavors locked away inside. Also give your bird a quick rinse, then set breast-side up on your cutting board. You might notice some big fat deposits clinging to the skin near the cavity. These can simply be pulled off and discarded.

The only part I waste besides the plastic, and only because I don't need more fat in my diet
Step 3: As I get told every day (it goes in one ear and out the other), exercise is good for you. The same goes for your meat... er... I know it sounds a bit macabre but this might be the one time you get to play with your food! Your once-feathered friend will be a bit stiff from it's trip to the supermarket, and some simple stretches will help free it up so your cutting job is a bit easier. Give the wing and leg joints a few good extensions until you feel them start to free up and get loose.

And a-One and a-Two, and a-One and a-Two!
Step 4: The first cut you will make will be to remove the leg and thigh combo, aka leg quarter, which is my favorite part... but you already know that from my Minneola Chicken recipe. First extend out the joint and hold it firm. Then pick up your boning knife (or whichever knife you will be using) and make the first incision in between the skin and staying close to the body until you hit the thigh joint.

Stay close to the body until you reach the joint
Step 5: It was at this point that I came up with the subtitle for this entry. My apologies for all you righties out there, you can now understand the grief us lefties go through every single time you show us how to do something. (See pictures if you don't get it yet. And no, I don't have ADD.) Once you hit the joint use your fingers (see figure below) to forcefully dislocate it. After you've popped it out you can simply cut through the remaining tissue and remove the whole leg quarter. Beautiful! Repeat for the other side!

Practice makes perfect

Nom nom nom
Step 6: Now we will remove the wings, which is a process very similar to removing the leg. Approaching from the armpit... rather... wingpit area cut in until you reach the joint, and pop it out just as you did with the thigh. You can then easily cut through and remove the wing. Repeat.


In any other context this photo would be disturbing
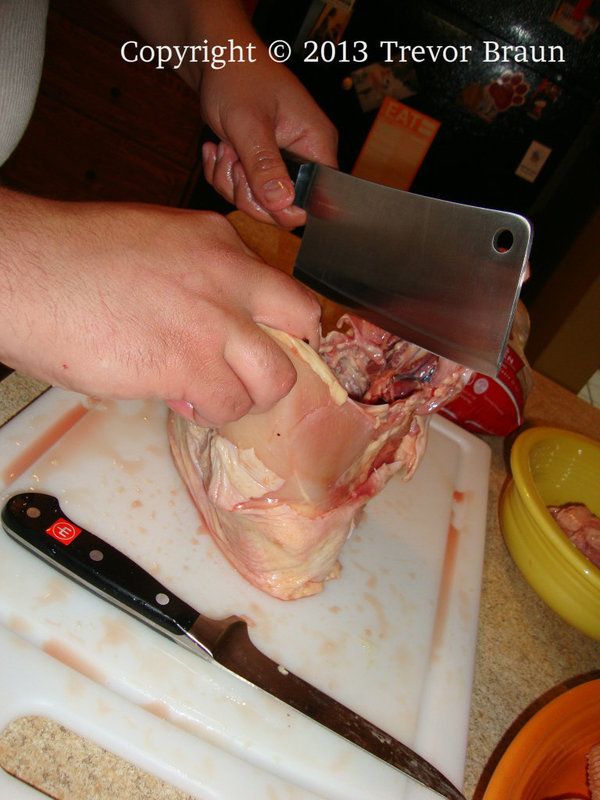
Step 7: Next we will remove the breasts. Take up your cleaver in one hand and rest the chicken vertically on the cutting board with the cavity facing up. With the legs removed you should be able to see where the breast and ribs connect to the back. Apply strong downward pressure with a slight sawing motion to almost effortlessly separate the breasts from the back. Use the weight of the cleaver to cut through the ribs; that's what it was designed to do! Cleavers are not incredibly sharp, and are cut at a wider angle than most other knives, making them extremely poor slicers. They get their strength from their weight and are an indispensable tool when cutting through bones and breaking-down meat and poultry.

Let the tool do the work
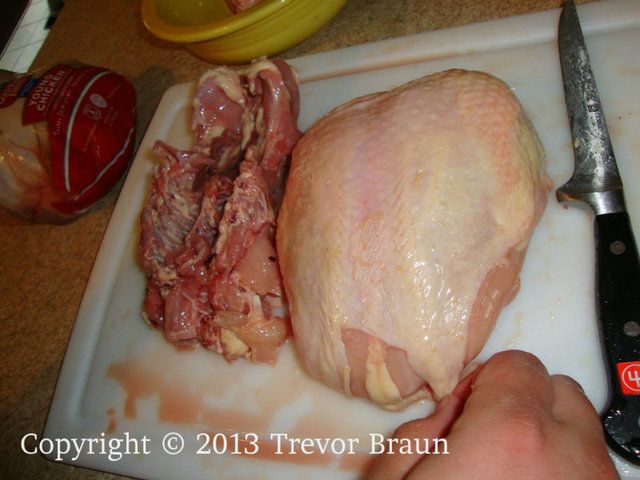
Step 8: At this point we have the following prepared parts: 2 leg quarters, 2 wings, 1 split breast, and a back. You could stop right here. A chicken breast that has not yet been separated is called a split breast, and while rather large are actually great for the grill. There are also some wonderful stuffed preparations utilizing aluminum foil along the underside. Keeping the breast together with the skin and bones helps the meat stay moist and flavorful. I almost always take it a step further though and separate the breasts; it makes the much easier to handle and serve for most dishes.

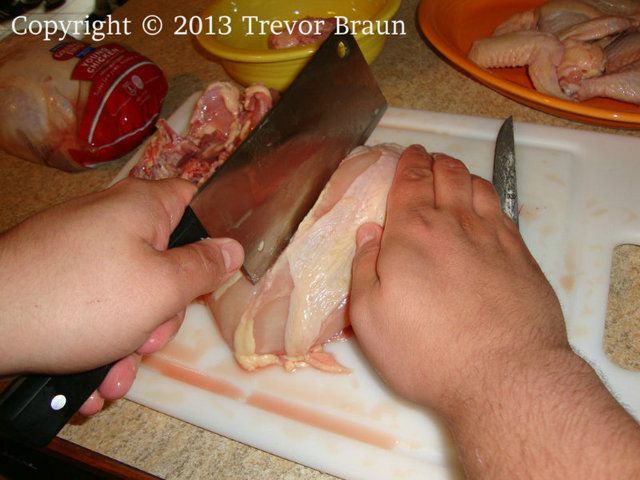
Again we will use our cleaver because we will be cutting through the breast bone. I like to make a quick slit to split the skin, and then set the cleaver along the bone. Finally give it a good solid pound with your fist and the breasts should split cleanly in two. Now that's what I call cleavage... I prefer to stop here, as I almost always leave the skin on through any cooking process; serving it skin-on it if it's crispy preparation or removing and discarding before serving if otherwise. Leaving the skin on during cooking really helps lock in moisture and provide a much tastier dish. If boneless skinless are your thing, then simply pull off the skin and cut out the remaining breast bones. It's really that simple.


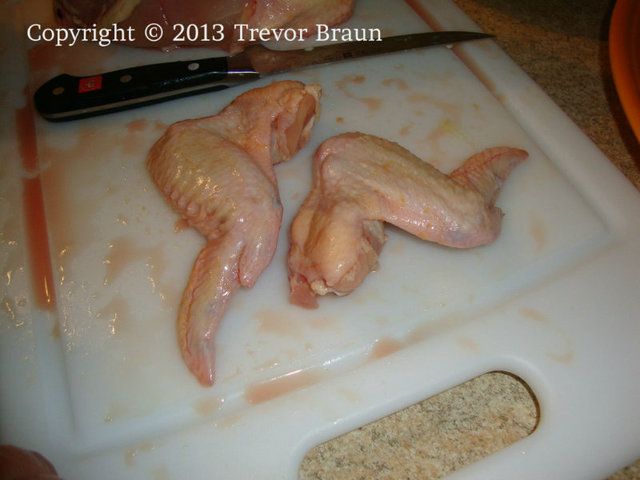
Step 9: If there's one all-american junk food I enjoy it has to be buffalo chicken wings. Consequently, chicken wings aren't really good for much else, but they are always broken down into those scrumptious little pieces. Using the cleaver and one firm fist pound remove the wing tip at the joint; I save all these for the stock pot. Finally, with your boning knife pop out and then cut through the remaining joint. Voila! Chicken Wings. I toss these all into a gallon freezer bag we keep in the deep freeze in the basement. When the bag gets full we fry up chicken wings. I can't think of a better utilization for this all-too oft overlooked appendage.


The best part of the chicken?
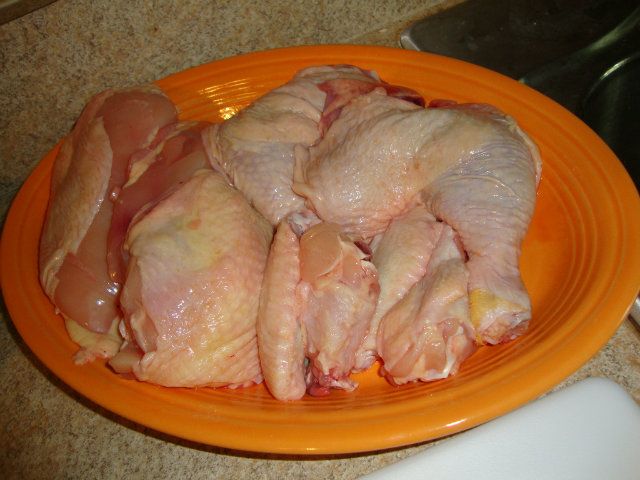
Step 10: You now have all your pieces parts separated, and after some practice your cuts will look just as clean as what you would buy at the supermarket. Carefully bag them up in whichever combination you please and freeze for later use, or toss them immediately on the grill, or in the oven. The possibilities are endless.

And you thought it was impossible!
Oh, I forgot, Step 11: Make sure you carefully clean everything up and sanitize all nearby surfaces. All that hacking about with your cleaver was bound to spray a little goo somewhere, and I personally don't prefer salmonella in my morning coffee.
So there you have it folks, another one for the books. Geeze... that took over 6 months. More to come, and sooner I hope!
All photos Copyright © 2013 Hands-On Cuisine/Trevor Braun
Subscribe to:
Posts (Atom)